If you have “Can’t connect to this network” issue with WAVLINK wireless adapter, here the instruction helps you troubleshoot.
Method 1: Forget Network
When a system connects to a network it stores the credentials, to make it easier for future logins. But when changes are made in the settings by the provider then the system might not be able to connect to the device. In that case, you must forget the network and try to connect again to the network as it can fix this network error.
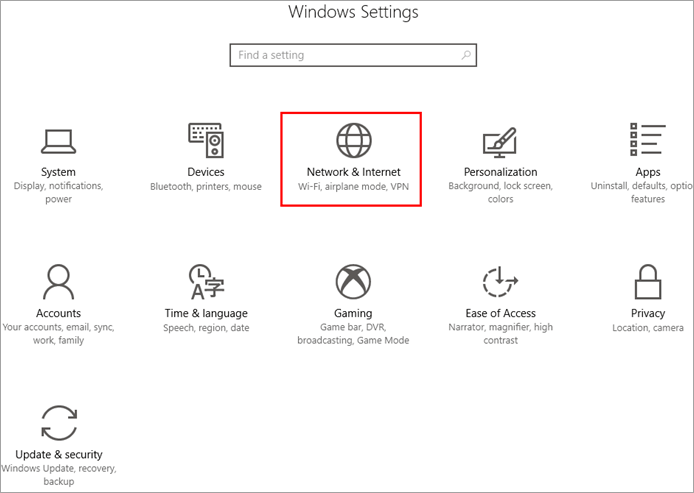
1) Open Settings and click on “Network & Internet” as shown in the image below.

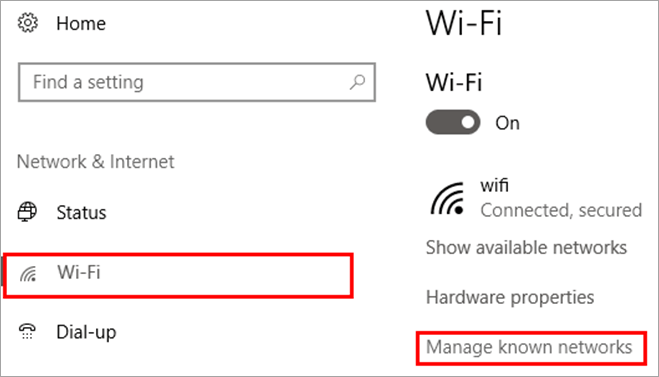
2) Click on “Wi-Fi” and then click on “Manage known networks” as shown below.
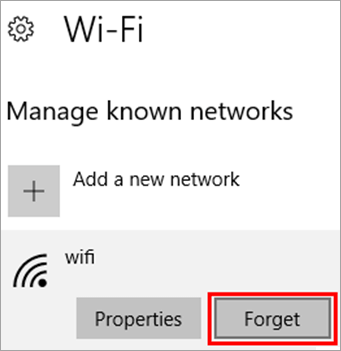
3) Now, click on the network provider and then click on “Forget”.
Now you must look for the network and the available connections and try to login with the credentials again to connect to the network.
Method 2: Enable/Disable Airplane Mode
Windows provides its users with a feature called Airplane mode. The feature allows users to disable and cut off all the connections of the system. Therefore, you must enable the Airplane mode and then disable it to connect to a network successfully.
Click on the bottom of the screen as shown in the image below, then click on “Airplane Mode” to enable it.
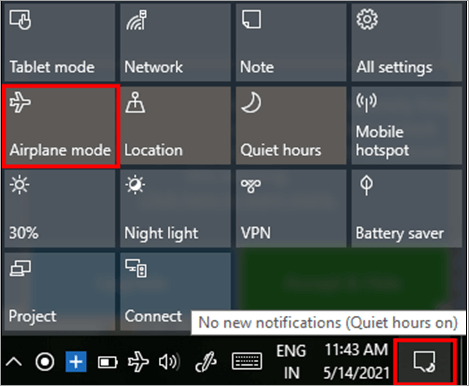
Now wait for few minutes and click again on the icon to disable Airplane Mode and try again to connect to the network provider.
Method 3: Uninstall Network Adapter Driver
The network adapter driver is responsible for maintaining and creating a connection to the network, and there can be a possibility that the Network Adapter driver is faulty. Therefore, the user must uninstall and reinstall the Network Adapter driver to fix the issue.
Follow the steps discussed below to uninstall the Network Adapter driver:
1) Press ‘’Windows + X’’ from the keyboard and click on “Device Manager” as shown in the image below.

3) Click on “Network adapters” and right-click on Wireless driver. Now, click on “Uninstall device”.
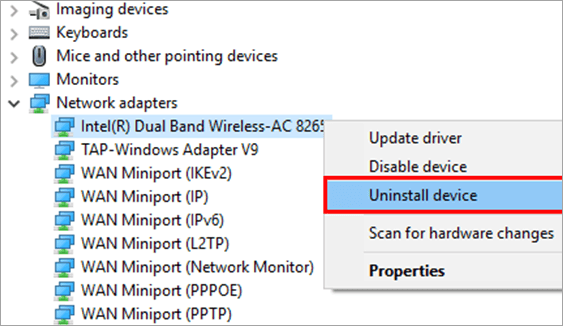
Now reinstall the driver and it will fix can’t connect to this network error.
Method 4: Flush DNS and Renew/Reset IP
The user must clear the DNS cache and Renew/Reset IP in the system and then try to connect to the network again. Click here to understand the steps to Flush DNS Cache On Windows 10 OS.
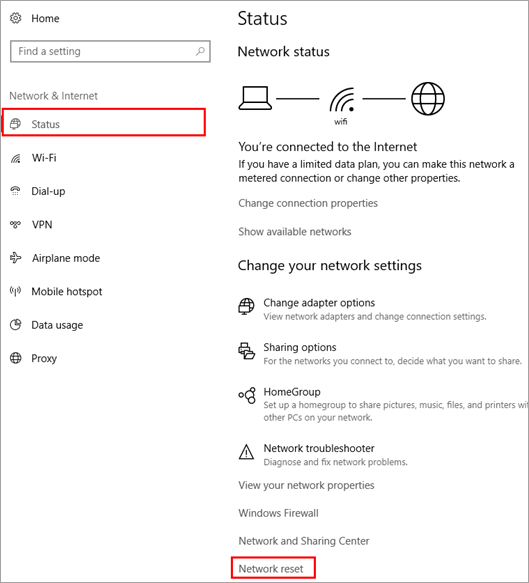
Method 5: Reset Network
Windows provides its users with the feature to reset network that allows them to restore network settings to its default.
Follow the steps listed below to reset the Network:
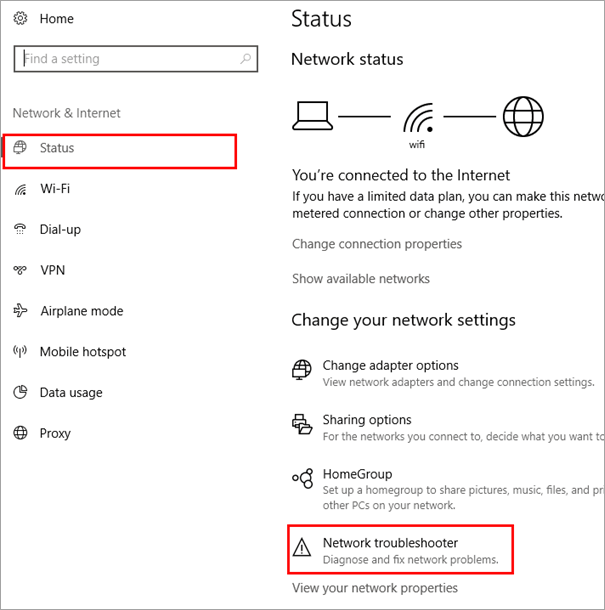
1) Open Network & Internet settings and click on “Status”. Then click on “Network reset” as shown in the image below.
2) Now, click on “Reset now”.
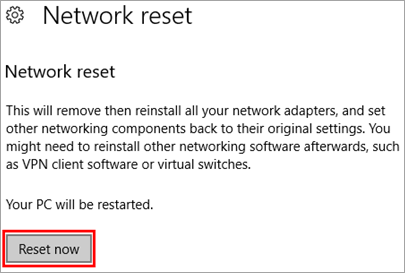
The system will restart and this network error will be fixed.
Method 6: Run Network Troubleshooter
Windows provides its users with a feature called Network Troubleshooter. The Network Troubleshooter not only allows the users to locate errors encountered while connecting to a network but also fixes the error.
Follow the steps listed below to run a network troubleshooter:
1) Open Settings and click on “Network & Internet” as shown in the image below.
2) Now click on “Status”, and then on “Network troubleshooter”.
Also Read =>> Network Troubleshooting Tools
Method 7: Run Network Adapter Troubleshooter
The user can run a Network Adapter troubleshooter on the system to fix network adapter-related errors.
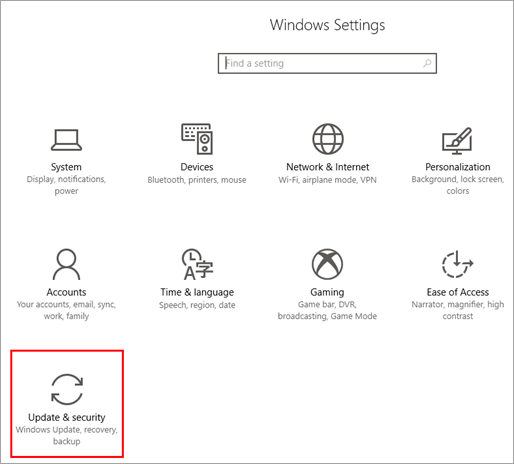
1) Open Settings and click on “Update & security” as shown in the image below.
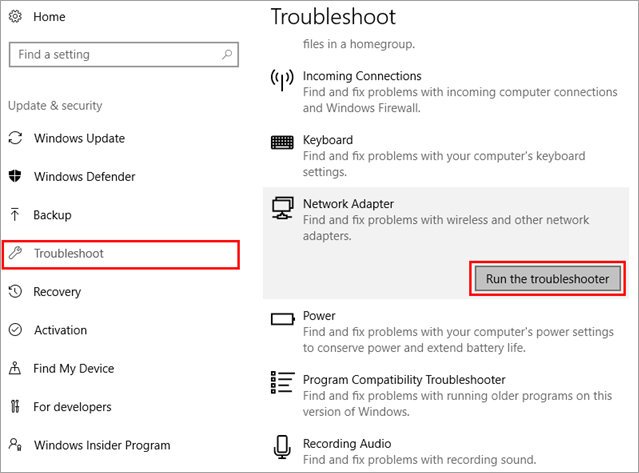
2) Now, click on “Troubleshoot”, then on “Network Adapter” and finally make a click on “Run the troubleshooter”.
The troubleshooter will start looking for the errors and will provide the recommended fixes.
Method 8: Add a Connection Manually
Windows provides its users with a feature that allows them to add a connection manually to the system. Follow the steps mentioned below to add a connection manually and fix can’t connect to this network error:
1) Open Control Panel, click on “Network and Internet” as shown in the image below.
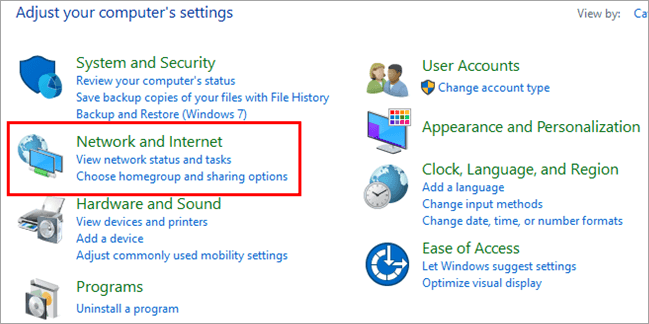
2) Now click on “Network and Sharing Center”.

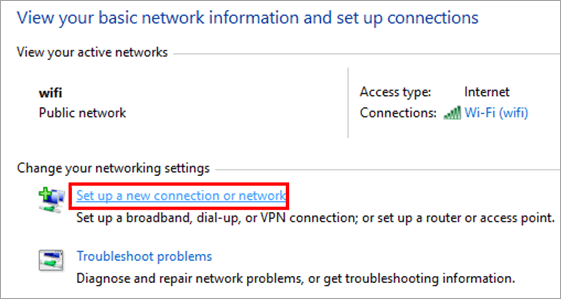
3) A dialog box will open, then click on “Set up a connection or network” as shown below.
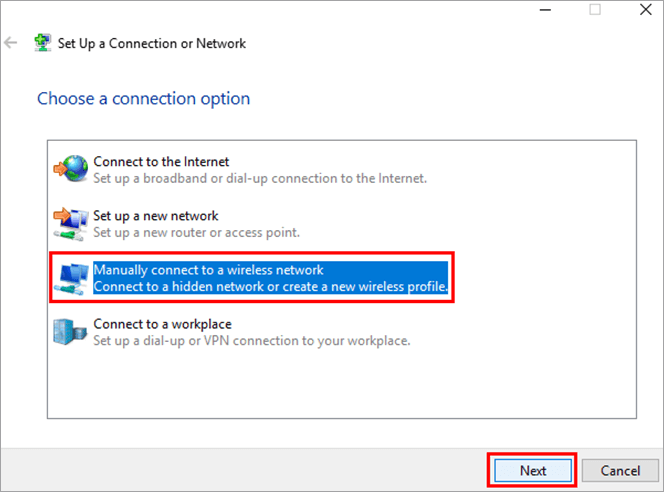
4) A dialog box will open, then click on “Manually connect to a wireless network”. Now, click on “Next”.
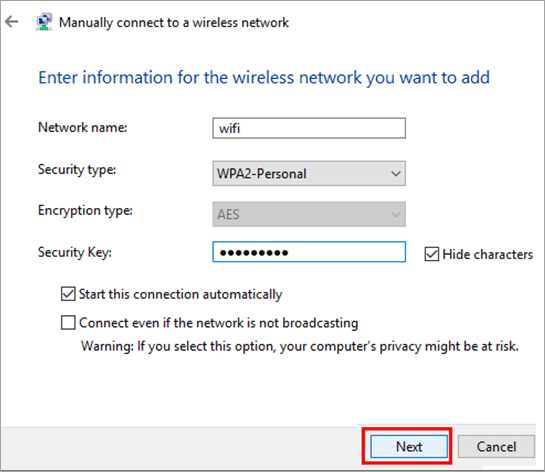
5) Enter the necessary credentials and click on “Next” as shown in the image below.
Method 9: Disable IPv6
Mostly the system uses IPv4 but there are specific tasks that require the use of IPv6. So, you must disable IPv6 on your system and enable it when needed.
Follow the steps listed below to disable IPv6:
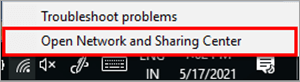
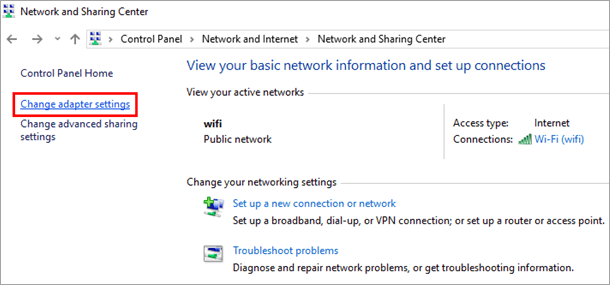
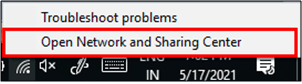
1) Right-click on the Wi-Fi option, click on “Open Network and Sharing Center” as shown in the image below.
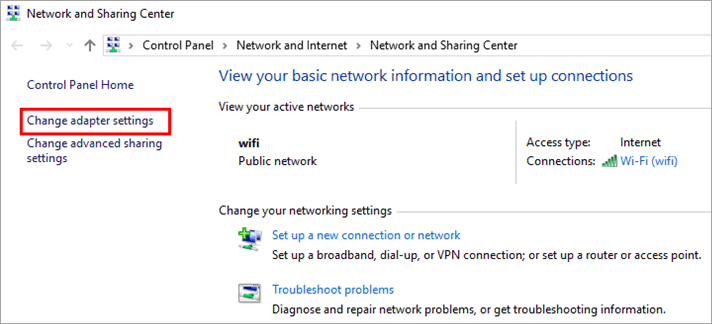
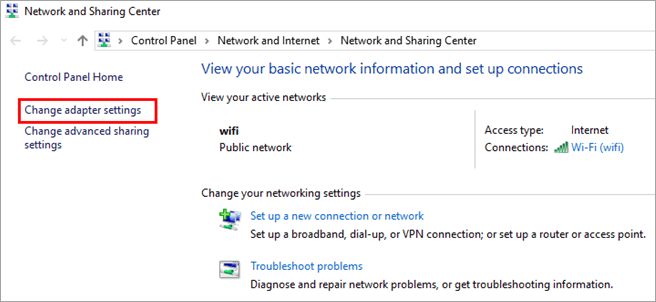
2) A window will open. Now, click on “Change adapter settings”.
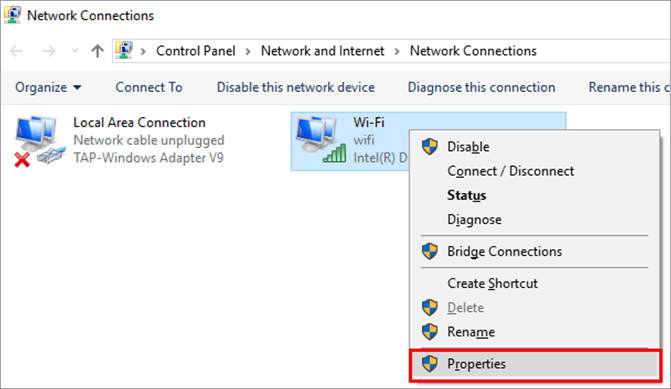
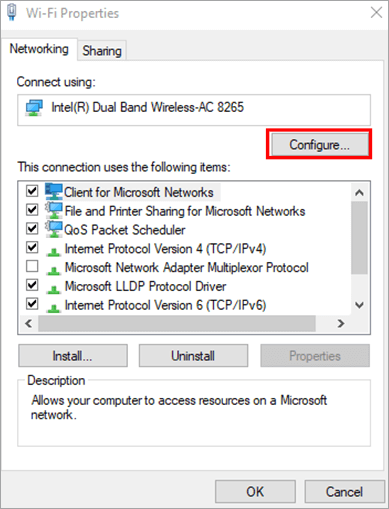
3) Right-click on your network and click on “Properties”.
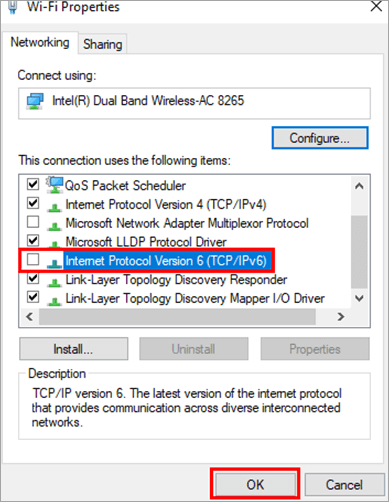
4) A dialog box will open as shown in the image below. Locate and uncheck “Internet Protocol Version 6 (TCP/IPv6)”, and click on “OK”.
Now restart your computer and try to connect to the network as now IPv6 is disabled on your system.
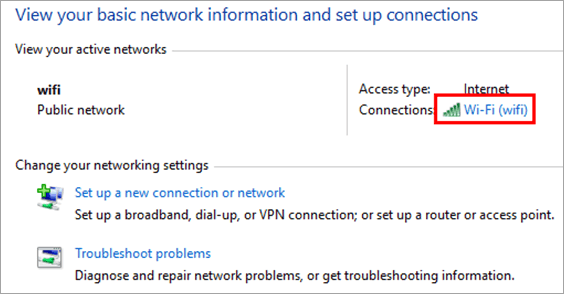
Method 10: Make Sure Adapter And Windows Are Using Same Security Type
Wi-Fi is protected with security, so you must make sure that the security type mentioned in the system should be the same as the security feature offered by the network provider.
1) Open Network and Sharing Center, and click on Wi-Fi as shown in the image below.
2) Now, click on “Wireless Properties”.
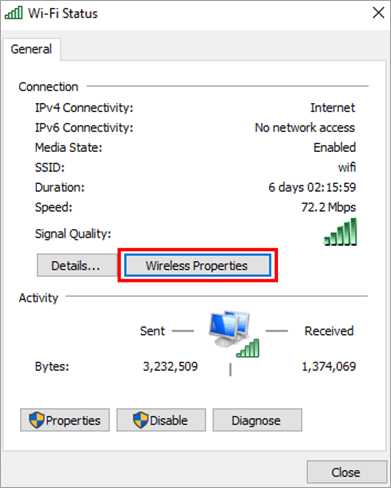
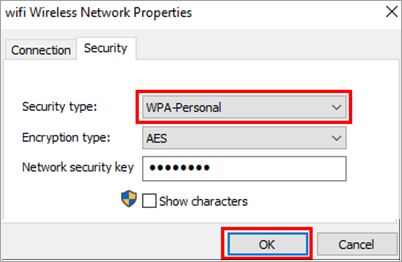
3) Now, click on Security, and verify the security type. Then click on “OK”.
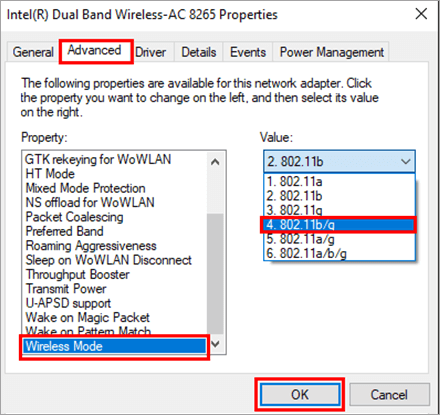
Method 11: Change Wireless Network Mode
There are various wireless network modes that allow the users to connect to a particular network.
Follow the steps mentioned below to change wireless network mode and fix can’t connect to this network error:
1) Open Network and Sharing Center and click on “Change adapter settings”.
2) Select your network, right-click on it and then click on “Properties” as shown in the image below.

3) A dialog box will open as shown in the image below, and then click on “Configure”.

4) Now, click on “Advanced”, and then click on “Wireless mode” and finally click on “802.11b/g”. After that click on “OK”.
Method 12: Disable/Enable NIC
Users must try to disable/enable NIC. Follow the steps mentioned below to fix can’t connect to network error:
1) Press ‘’Windows + R’’ from the keyboard and search for “ncpa. cpl” and click on “OK”.

2) Dialog box will open, right-click on the network, and click on “Disable” as shown in the image below.

3) Then enable it and restart the system and can’t connect to network error will be resolved.
Method 13: Change Channel Width For Your Network Adapter
You can also fix this error by changing the width of the channel via which the system connects to the network. Follow the steps listed below to change the channel width for your network adapter:
1) Right-click on the Wi-Fi option, and then click on “Open Network and Sharing Center” as shown in the image below.
2) A window will open. Now, click on “Change adapter settings” as shown in the image below.
3) Right-click on your network and then on the “Properties”.

4) A dialog box will open. Then click on “Configure”.
5) Click on “Advanced”>”802.11n Channel Width for 2.4GHz”>”20MHz only”, then click on “OK” as shown in the image below.
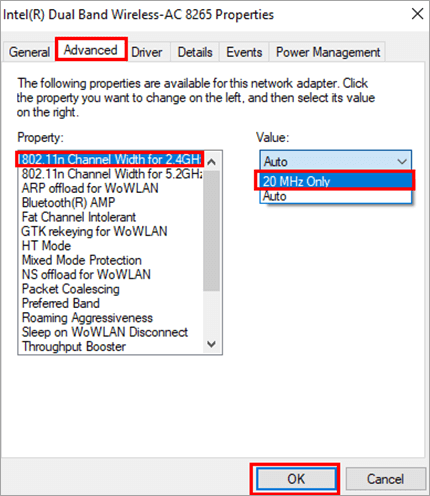
This will change the width of the channel which might fix this error.
Method 14: Change Power Options
By changing the power options and increasing the performance of the system, you can fix this error and connect to the network easily. Follow the steps discussed below to fix this error:
1) Search for “Power & Sleep settings” and click on it as shown in the image below.

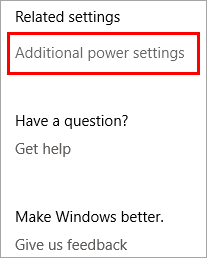
2) A dialog box will open as shown in the image below and then click on “Additional power settings”.
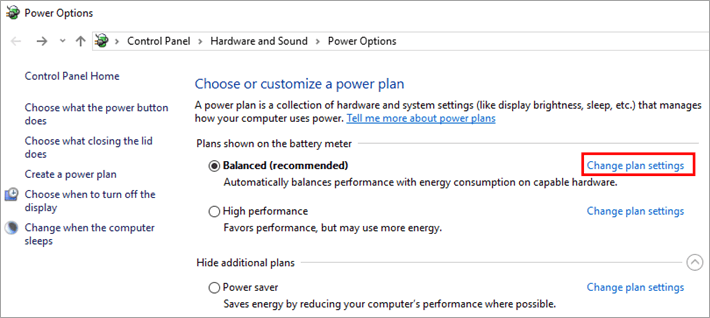
3) Click on “Change plan settings”.
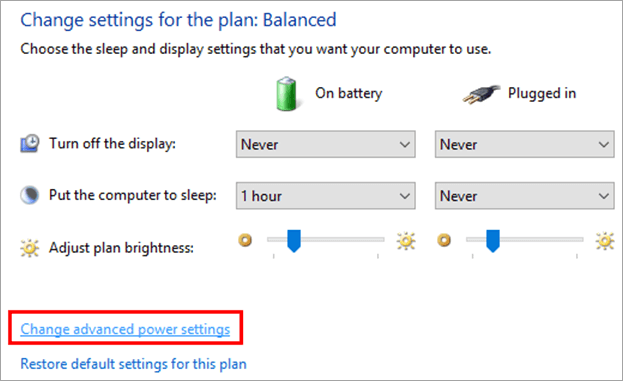
4) A window will open as below. Then click on “Change advanced power settings”.
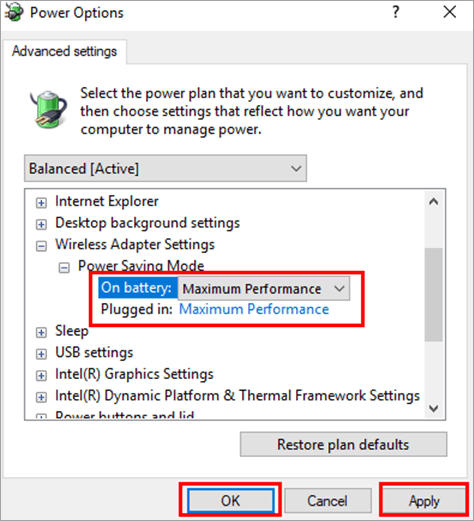
5) A dialog box will open, as shown below. Locate “Wireless Adapter Settings”, click on “Power Saving Mode” and then click on the drop-down list. Finally, click on “Maximum Performance”. After then click on “OK” and “Apply”.
This will allow your system to work on Maximum Performance and fix this error.
Get the Scoop First
Subscribe to our official website to receive exclusive first-hand news and stay up-to-date on our new product releases and promotions!